Ever since I was a child, Christmas Zebra Cakes have been a cherished treat in my household. The soft, vanilla-flavored cake and the creamy filling always seemed to disappear from the pantry in no time! Now that I’m older, I love recreating those beloved snacks in my own kitchen, with a festive flair that makes them perfect for the holiday season.
Table of Contents
How to make Christmas Zebra Cakes
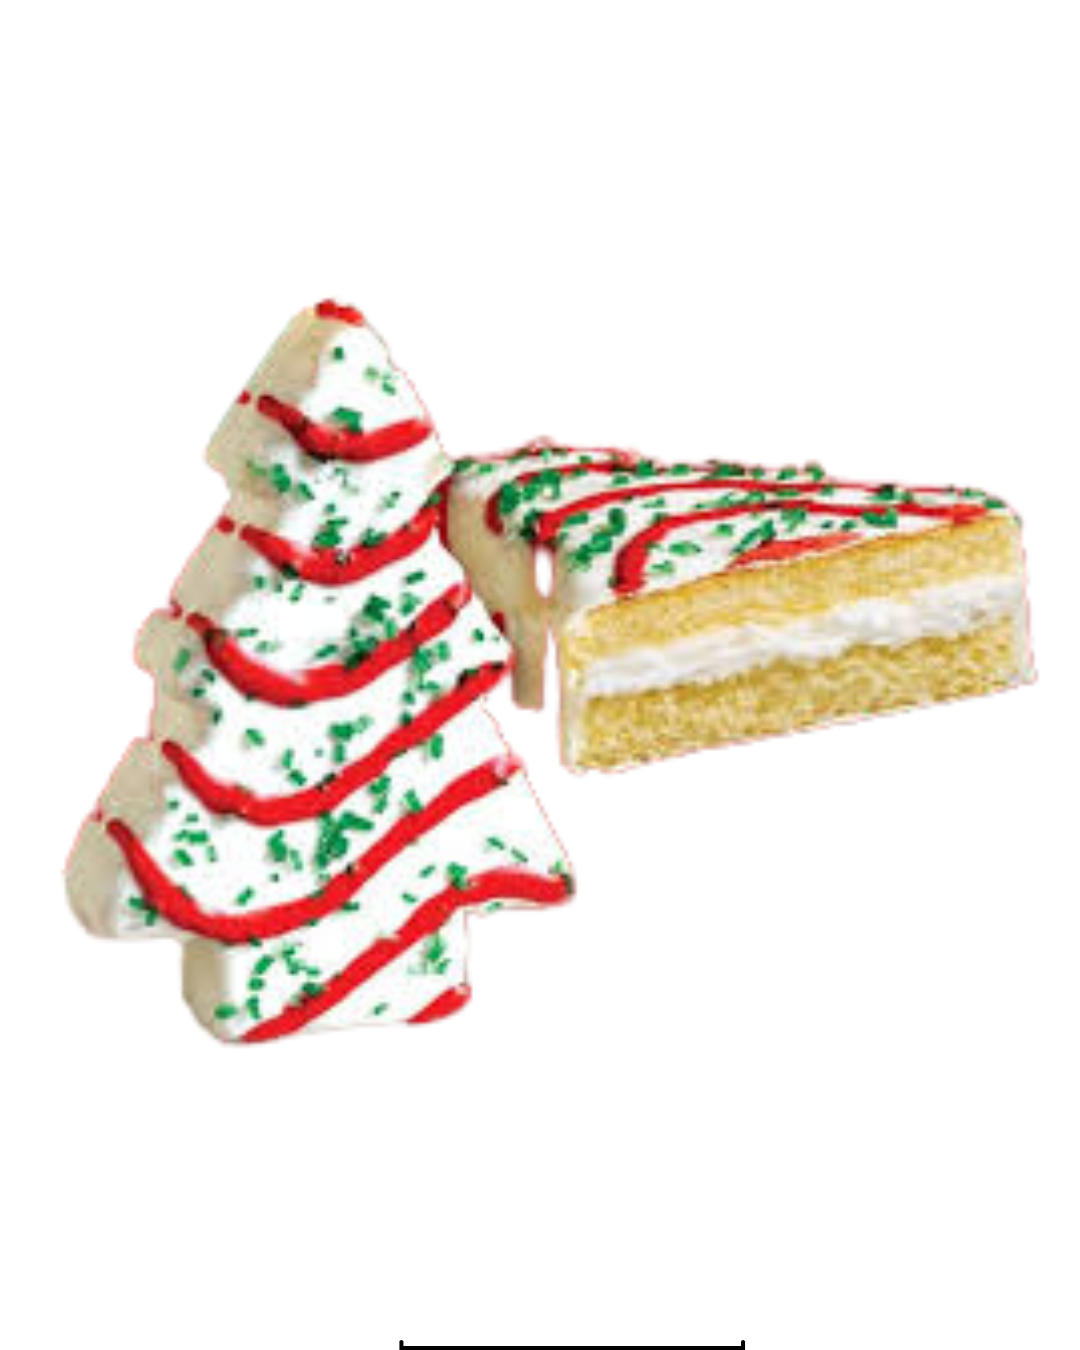
Christmas Zebra Cakes are a limited-edition holiday version of the classic Little Debbie Zebra Cakes.
Ingredients
For the Cake:
- 1 cup all-purpose flour
- 1 teaspoon baking powder
- 1/4 teaspoon salt
- 4 large eggs (room temperature, separate egg whites and yolks)
- 1 cup granulated sugar
- 1 teaspoon vanilla extract
- 1/4 cup whole milk
- 2 tablespoons unsalted butter (melted and cooled)
For the Filling:
- 1 cup unsalted butter (softened)
- 1 1/2 cups powdered sugar
- 1 teaspoon vanilla extract
- 1 tablespoon milk or heavy cream (add more if needed for consistency)
For the Frosting and Decoration:
- 2 cups white chocolate or vanilla candy melts
- Green and red gel food coloring
- Piping bags or resealable plastic bags (for drizzling designs)
- Optional: festive sprinkles or edible glitter
Instructions
Step 1: Prepare the Cake Layers
- Preheat your oven to 350°F (175°C) and line a 9×13-inch baking pan with parchment paper. Lightly grease the paper to prevent sticking.
- In a mixing bowl, whisk together the flour, baking powder, and salt. Set aside.
- In another large bowl, beat the egg yolks and granulated sugar until the mixture turns pale and thick (about 2-3 minutes). Add the vanilla extract, milk, and melted butter, then mix until combined.
- Gradually fold the dry ingredients into the egg yolk mixture. Be gentle to avoid overmixing—it should be a smooth batter.
- In a separate bowl, beat the reserved egg whites with a hand or stand mixer until stiff peaks form. Gently fold the egg whites into the batter in batches, ensuring an even, airy mixture.
- Pour the batter into the prepared pan and spread evenly. Bake for 12-15 minutes, or until a toothpick inserted into the center comes out clean.
- Allow the cake to cool completely. Once cooled, remove it from the pan and use a Christmas tree-shaped cookie cutter (or your preferred festive shape) to cut out individual pieces.
Step 2: Make the Filling
- In a medium bowl, beat the softened butter until smooth and creamy using a hand mixer.
- Gradually add the powdered sugar, one-half cup at a time, mixing well to avoid lumps.
- Add the vanilla extract and milk until you achieve a spreadable consistency. If it’s too thick, add an extra teaspoon of milk.
- Spread a generous layer of cream filling onto one cut-out cake piece and sandwich it with another. Repeat for all your cakes. Place them in the fridge for 15 minutes to firm up.
Step 3: Decorate Your Cakes
- Melt the white chocolate or vanilla candy melts in a microwave-safe bowl, heating in 20-second intervals and stirring until smooth. Separate into three bowls: keep one bowl white, and color the other two with green and red food coloring.
- Dip each sandwiched Zebra Cake into white chocolate, fully coating it. Place it on a wire rack with parchment underneath to catch excess drips.
- Spoon the colored chocolate into piping bags or resealable plastic bags with the tip snipped off. Drizzle the red and green chocolate over the white-coated cakes to create beautiful zebra stripes.
- Optionally, sprinkle edible glitter or holiday-themed sprinkles over the cakes while the frosting is still wet.
Step 4: Let Them Set
- Let your decorated cakes sit at room temperature for 30 minutes, or refrigerate them for faster setting.
- Once the frosting has hardened, serve your beautiful Christmas Zebra Cakes to family and friends, and watch their faces light up!
Tips for Success
- Shape flexibility: If you don’t have a cookie cutter, you can cut the cake into rectangles or other creative shapes.
- Even stripes: Practice drizzling on parchment paper if it’s your first time working with melted chocolate for decoration.
- Storage: Store Zebra Cakes in an airtight container for up to 3 days at room temperature or 5 days in the fridge.
- Shortcuts: Use store-bought pound cake for an even quicker version, but be sure to slice it thinly!
What to serve with
When serving Christmas Zebra Cakes, pairing them with complementary beverages, snacks, or even festive table decor can elevate their presentation and enhance the holiday spirit.
- Hot Chocolate: Rich and creamy hot chocolate is a classic pairing for Zebra Cakes. You can elevate it by adding whipped cream, mini marshmallows, and a dusting of cocoa powder or crushed peppermint. Serve in festive mugs for a holiday vibe!
- Coffee or Espresso: A warm cup of coffee balances the sweetness of the Zebra Cakes perfectly. Consider offering flavored coffee options, like peppermint mocha or cinnamon spice, to match the holiday theme.
- Holiday Tea: Serve seasonal teas like apple cinnamon, chai spice, or cranberry orange. Include a honey drizzle or festive infusers for an elegant touch.
- Eggnog: Creamy eggnog with a sprinkle of nutmeg pairs wonderfully with Zebra Cakes, especially if your guests prefer traditional holiday drinks.
- Festive Punch: Create a sparkling cranberry or citrus punch for a refreshing accompaniment. Use ginger ale, lime soda, or sparkling water mixed with cranberry juice and top with fresh cranberries or orange slices.
Ingredients Substitutes
Sometimes, you may need to substitute ingredients due to dietary restrictions, personal preferences, or availability.
1. All-Purpose Flour
Substitution: Use gluten-free all-purpose baking flour if serving guests with gluten sensitivity. Look for blends specifically labeled for baking, as these often include xanthan gum or a similar binding agent.
Alternative: Replace with almond flour for a denser, nutty flavor; however, the texture will be slightly less airy. You’ll also need to reduce the liquid slightly, as almond flour absorbs less moisture.
2. Baking Powder
Substitution: If baking powder isn’t available, you can mix 1/4 teaspoon baking soda with 1/2 teaspoon cream of tartar for each teaspoon of baking powder required.
3. Eggs
Eggs provide structure and moisture to the cake, so substitutions should be carefully chosen.
Substitution for Whole Eggs: Replace each egg with:
- 1/4 cup unsweetened applesauce (for moisture and slight sweetness)
- 1/4 cup mashed banana (for a hint of tropical flavor)
- 3 tablespoons aquafaba (the liquid from canned chickpeas, perfect for vegan baking)
- Substitution for Egg Whites: Use aquafaba or powdered egg replacer instead of whipping egg whites for volume. This maintains the light texture in recipes requiring beaten egg whites.
4. Granulated Sugar
Substitution: Replace granulated sugar with:
- Coconut sugar for a natural, unrefined option (this may slightly darken the cake).
- Maple syrup or honey (reduce liquid in the recipe slightly to compensate for the added moisture).
- Sugar substitutes (like stevia, erythritol, or monk fruit sweetener) for a low-calorie or diabetic-friendly option.
5. Vanilla Extract
Substitution: Try these alternatives:
- Almond extract for a nutty and festive flavor.
- Maple extract for a rich, holiday-sweet twist.
- Rum or brandy extract for a deeper, spiced flavor reminiscent of traditional Christmas desserts.
Final Thoughts
Christmas Zebra Cakes are delicious and festive on their own, but pairing them with warm drinks, seasonal sides, and thoughtful decor creates a magical experience.
More Cakes Recipes:

Ingredients
For the Cake:
- 1 cup all-purpose flour
- 1 teaspoon baking powder
- 1/4 teaspoon salt
- 4 large eggs
- 1 cup granulated sugar
- 1 teaspoon vanilla extract
- 1/4 cup whole milk
- 2 tablespoons unsalted butter
For the Filling:
- 1 cup unsalted butter (softened)
- 1 1/2 cups powdered sugar
- 1 teaspoon vanilla extract
- 1 tablespoon milk
For the Frosting and Decoration:
- 2 cups white chocolate
- Green and red gel food coloring
- Piping bags
Optional: festive sprinkles
Instructions
Step 1: Prepare the Cake Layers
- Preheat your oven to 350°F (175°C) and line a 9x13-inch baking pan with parchment paper. Lightly grease the paper to prevent sticking.
- In a mixing bowl, whisk together the flour, baking powder, and salt. Set aside.
- In another large bowl, beat the egg yolks and granulated sugar until the mixture turns pale and thick (about 2-3 minutes). Add the vanilla extract, milk, and melted butter, then mix until combined.
- Gradually fold the dry ingredients into the egg yolk mixture. Be gentle to avoid overmixing—it should be a smooth batter.
- In a separate bowl, beat the reserved egg whites with a hand or stand mixer until stiff peaks form. Gently fold the egg whites into the batter in batches, ensuring an even, airy mixture.
- Pour the batter into the prepared pan and spread evenly. Bake for 12-15 minutes, or until a toothpick inserted into the center comes out clean.
- Allow the cake to cool completely. Once cooled, remove it from the pan and use a Christmas tree-shaped cookie cutter (or your preferred festive shape) to cut out individual pieces.
Step 2: Make the Filling
- In a medium bowl, beat the softened butter until smooth and creamy using a hand mixer.
- Gradually add the powdered sugar, one-half cup at a time, mixing well to avoid lumps.
- Add the vanilla extract and milk until you achieve a spreadable consistency. If it's too thick, add an extra teaspoon of milk.
- Spread a generous layer of cream filling onto one cut-out cake piece and sandwich it with another. Repeat for all your cakes. Place them in the fridge for 15 minutes to firm up.
Step 3: Decorate Your Cakes
- Melt the white chocolate or vanilla candy melts in a microwave-safe bowl, heating in 20-second intervals and stirring until smooth. Separate into three bowls: keep one bowl white, and color the other two with green and red food coloring.
- Dip each sandwiched Zebra Cake into white chocolate, fully coating it. Place it on a wire rack with parchment underneath to catch excess drips.
- Spoon the colored chocolate into piping bags or resealable plastic bags with the tip snipped off. Drizzle the red and green chocolate over the white-coated cakes to create beautiful zebra stripes.
- Optionally, sprinkle edible glitter or holiday-themed sprinkles over the cakes while the frosting is still wet.
Step 4: Let Them Set
- Let your decorated cakes sit at room temperature for 30 minutes, or refrigerate them for faster setting.
- Once the frosting has hardened, serve your beautiful Christmas Zebra Cakes to family and friends, and watch their faces light up!